Custom TCP Drone Protocol
Posted: June 19, 2024
Last edited: October 19, 2025
Source Code
This blog post is heavily based on the publicly available source code for one of my previous projects which can be found here.
Introduction
During my fourth semester on my bachelor of science in robotics, my (at the time) group and I took on a drone project to try and figure out how one could use deep learning, computer vision and network programming to navigate fields, detect rocks and effectively remove them from fields to prevent hardware damage on farming equipment. It was a very ambitious semester project and it covers a lot of ground, but what I want to focus on in this post is the networking aspect of it.
The project is done in C++ and we made it from the ground up with some help from a friend in the UK who had the most experience with networking. It is important to know that this drone project was not just “using a drone to detect stones” - the drone was to be autonomous. For this reason we wanted a way to track the drone as it flew along its path, see what it saw and actively monitor logging on the drone as it was going about its flight trajectory over a field, combined with running onboard AI computer vision code (using the YOLO model), PID regulation and so much more.
The drone in use for this project was a Matrice 100 drone manufactured by DJI which came with an attached linux computer that communicated with the flight-control computer through ROS. This begs the question: Why did we not just use ROS nodes to connect wirelessly from the ground to the drone in-flight?
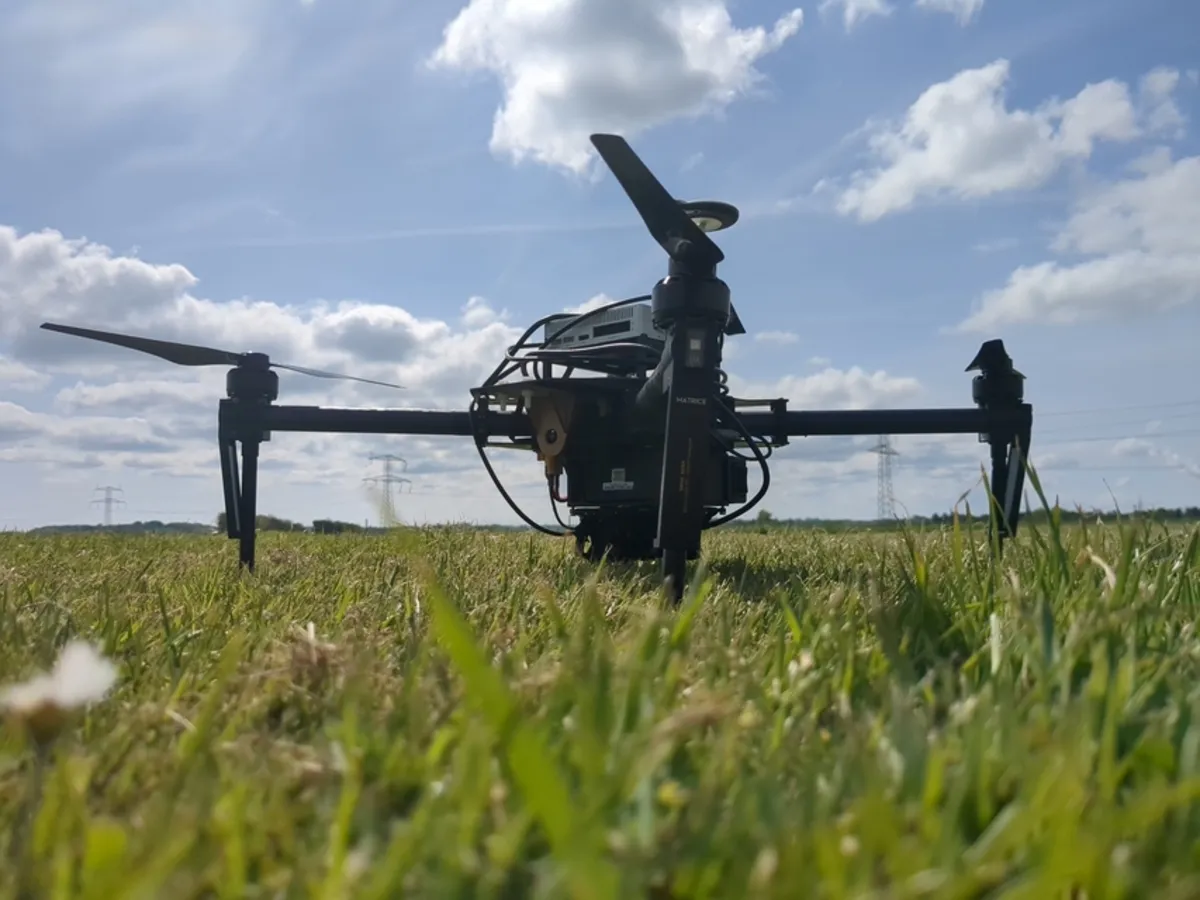 The drone we used
Through some experimentation we quickly discovered that there were serious limitations to the speed of which the drone and external monitoring laptop would communicate using ROS nodes. The attached linux computer ran a rather old Ubuntu 14 distribution and because of how it was setup we were limited to use ROS Indigo which is very old, and obviously not the better choice compared to ROS2. In any case, we wanted to actually transmit images mid-flight from the drone to the monitor so we felt comeptent and brave enough to take on our own protocol for it. We quickly settled on a packet based TCP solution where we organized bytedata in a specific way to encode and decode data exchanged between the drone and the monitor. We also opted for asynchronous communication that did not restrict package exchanges to be conversational in the sense that one packet demands a response packet, but rather:
- Receive a packet
- Handle the packet
- Respond with a packet (if needed)
This splits the project up into two parts: A backend and a frontend. Both are part of the solution, but they run on different hardware. What we consider the “backend” is where we host a network connection. Any frontend (also typically called a ‘client’) can connect to one backend. In this case we can have multiple frontends / clients, but only one backend. The backend (also typically called the ‘server’) is the drone, and the frontend/client(s) are monitor laptops. We made a graphical user-interface using Dear ImGui for the frontend which was made to run on Windows 10:
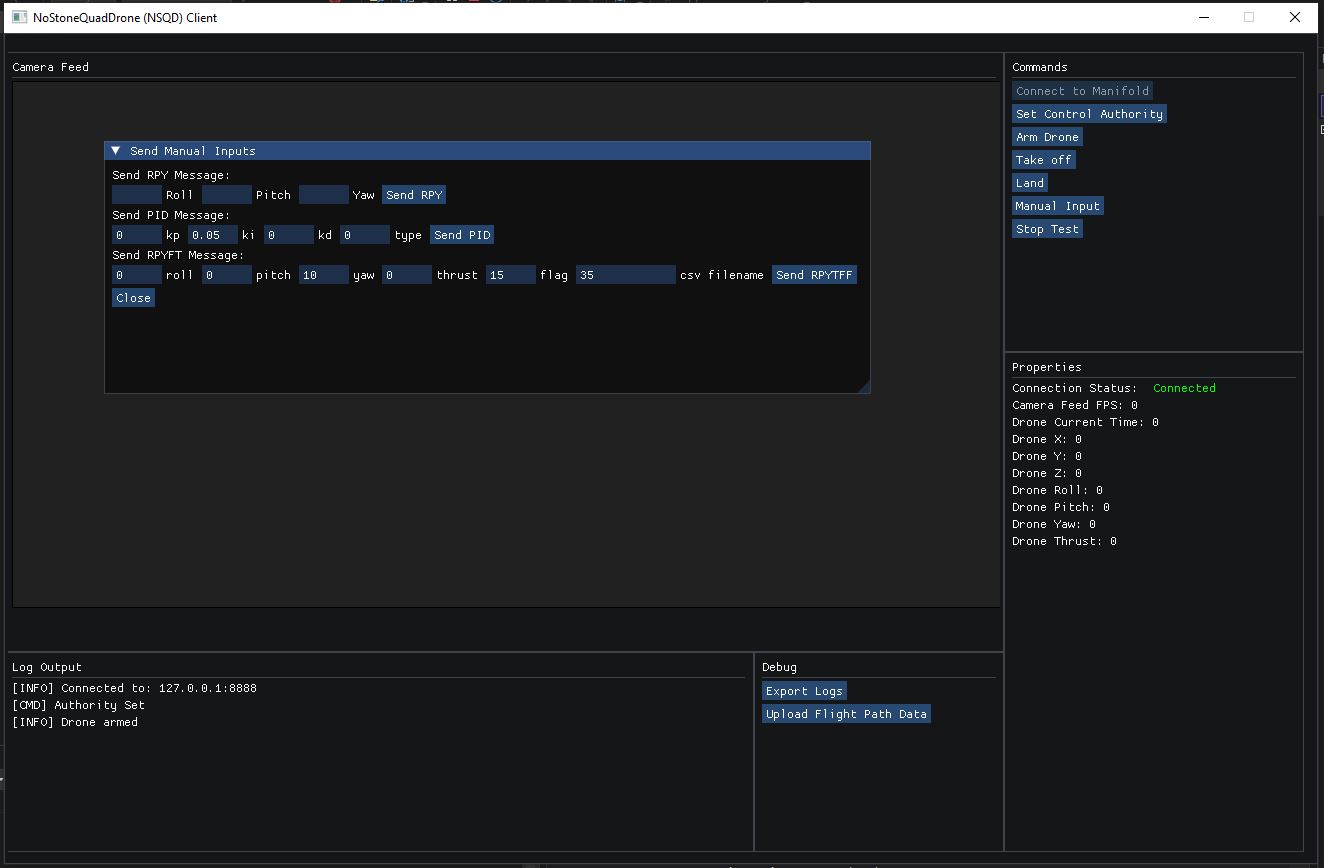 The frontend application window
The backend was linux based (Ubuntu 14) and it covered all of the drone operations. For testing purposes and experimentation we used the two-way communication of our TCP protocol to allow input from the monitoring client so that we could change things like interpolation speed along the flight trajectory (made up of GPS-defined viapoints to fly to, or near), PID values, when to take an image with the mounted camera, dump logs and more. When making a project like this where two codebases make up one solution it becomes crucial to keep the code tight to a convention that ensures both ends of the networking solution speaks the same language in terms of encoding and decoding data as well as data architecture . Furthermore, writing C++ networking code also means it is not cross-platform compatible. There is no “one single solution” (as far as I know) that works on both windows and linux so the socket code for both ends vary, but the packets must be 1:1 on the byte level!
The way to do this is to figure out a way to structure and identify packets. It is important to know that TCP in and of itself is a continuous stream of data that never ends while connected and transmitting. Thankfully TCP is sequenced in that flow, meaning data that makes up the stream is flowing in the order that it was sent which makes it predictable. Furthermore TCP does not allow skipping over some data in the stream. You receive and parse every byte of data to effectively “remove it” from the stream, making TCP lossless, for lack of a better term. Based on all of this; we need a way to predict when a packet begins, and when it ends to cut this big stream of data into individual packets we can process and handle on either side of the networking solution.
Consider the following figure:
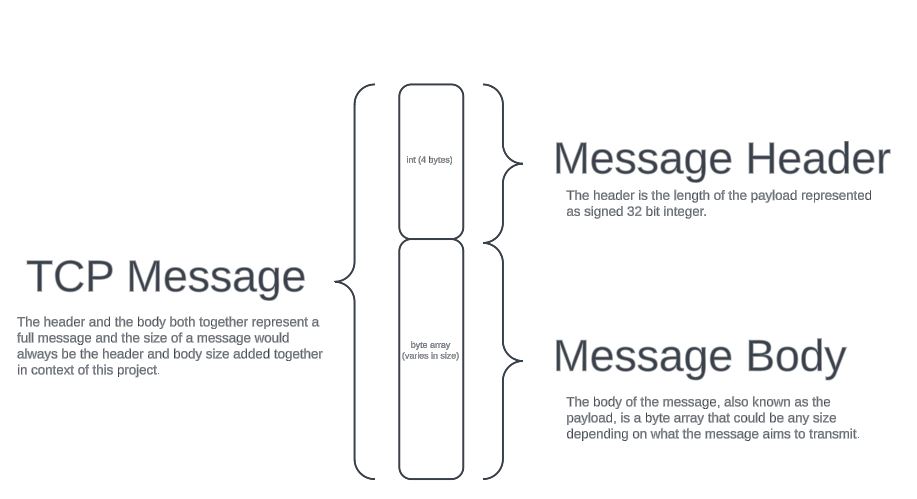 Packet structure
The above demonstrates the structure of any packet sent through this protocol. Every packet consists of two parts: A head and a body, often also referred to as a header and a body/payload. We always write the header first, then the body. The reason for this is because the header describes the length of the body that can contain any amount of variables written (we do not know at the time of receiving a packet). The header contains:
- A byte that assigns a numerical id to the packet (packet id: 1 corresponds to one and only one type of packet. It must be a unique number per type.)
- A 32 bit integer that describes the length of the body (this way we know when to stop reading the stream, effectively marking the next packet in the stream)
This should be pretty straight forward, let us look at how this is then applied in the code. First on the backend:
struct Message {
    virtual void encode(Encoder& encoder) = 0;
    virtual void decode(Decoder& decoder) = 0;
};
The definition of a message contains an encoder and a decoder, which are simply classes that contains read and write functions that can take a byte array or any data type and convert a byte array to a data type or the other way around. Example:
void Read(char* data, unsigned int size) {
    if (_position + size > _buffer.size()) {
        throw std::runtime_error("Not enough data in buffer");
    }
    memcpy(data, &_buffer[_position], size);
    _position += size;
}

void ReadShort(short* value) {
    Read(reinterpret_cast<char*>(value), sizeof(short));
    *value = ntohs(*value);
}

void ReadString(std::string* value) {
    short size;
    ReadShort(&size);
    value->assign(&_buffer[_position], size);
    _position += size;
}
The buffer contains the entire stream of data being sent to the receiving socket this code runs on and a variable such as _position is then used as a “cursor” to indicate where in the buffer we are standing. In the connection handler we receive the stream of data and populate the buffer (which is just a variable we create at respective initialization of either ends):
int bytesReadable = 0;
int result = recv(_socket, reinterpret_cast<char*>(&bytesReadable), sizeof(int), MSG_PEEK);

if (result <= 0) {
    // this means 'disconnect'
    disconnect();
}
else {
    // handle what is received!
}

...

// + 4 as thats offset to what we already read
Decoder decoder(b.data() + 4, _currentSize);

// Check the first byte (identifier)
unsigned char messageId;
decoder.ReadByte(&messageId);
std::cout << "Received message (ID): " << (int)messageId << '\n';

// Handle the message
switch ((int)messageId)
{
    case ERROR_MSG: {
        ErrorMessage msg;
        msg.decode(decoder);
        std::cerr << "[CLIENT_ERROR] " << msg.text << std::endl;
    }
    case SET_AUTH_MSG: {
        int result = _drone->request_permission();
        if (result == 0) {
            SendError("<drone::request_permission>: Failed to call sdk authority service");
        }
        break;
    }

    // Various packet handlers would be here

    default: {
        std::cerr << "Unrecognized message id: " << (int)messageId << std::endl;

        // Send error to frontend.
        std::string errText = "Drone received unrecognized message with id: ";
        errText += std::to_string((int)messageId);
        //SendError(errText);

        *state = HOVER_STATE;
        break;
    }
}
The frontend works the same way. Receive something on a socket that was established, try to map the id to a type of packet, handle it and move on. And besides the fact that they work the same, the code is a only slightly different because of how the socket is set up and the multi-threading that allows the GUI to run in a loop while the networking also does. I highly recommend checking out the repository linked above (or here) to get a better understanding of how it all works. I might elaborate on the concept of developing a simple client/server project in C++ or C# one day. Maybe something in style with a tutorial, as this was more like a recap of how this project’s networking solution was developed.
Thank you for reading, and goodbye!